 학술연구정보서비스(KERIS)


권호기사보기
| 기사명 | 저자명 | 페이지 | 원문 | 기사목차 |
|---|
| 대표형(전거형, Authority) | 생물정보 | 이형(異形, Variant) | 소속 | 직위 | 직업 | 활동분야 | 주기 | 서지 | |
|---|---|---|---|---|---|---|---|---|---|
| 연구/단체명을 입력해주세요. | |||||||||
|
|
|
|
|
|
* 주제를 선택하시면 검색 상세로 이동합니다.
표제지
요약
목차
Ⅰ. 서론 13
1.1. 연구 배경 13
1.2. 연구 목적 15
1.3. 연구방법 17
Ⅱ. 연구사 19
2.1. 호안구조물의 파괴 원인 19
(1) 국부세굴에 의한 파괴 21
(2) 유수에 의한 파괴 21
(3) 흡출파괴 21
(4) 잔류수압에 의한 파괴 21
(5) 호안머리의 침식파괴 22
(6) 직접 충격에 의한 파괴 22
2.2. 앵커의 인발거동 특성 연구 24
Ⅲ. 이론적 고찰 30
(1) Balla(1961)의 이론 32
(2) Meyerhof and Adams(1968)의 이론 37
(3) Vesic(1971)의 이론 42
(4) Saeedy(1987)의 이론 (수정사항필요) 48
(5) Cone method 50
(6) Shear method 51
(7) Ireland(1963)의 이론 52
(8) Bearing capacity cavity 53
Ⅳ. 현장인발실험을 통한 앵커핀의 인발하중 및 지반의 변형특성분석 55
4.1. 현장인발실험 개요 55
4.2. 현장실험 준비과정 57
(1) 플레이트 앵커핀 제작 57
(2) 현장지반조건 59
4.3. 실험계획 및 과정 62
4.4. 현장실험결과 67
(1) 최대인발하중 67
(2) 지반변형 70
(3) 영향범위 73
4.5. 이론식과의 비교·분석 75
(1) Meyerhof and Adams(1968)의 이론식 75
(2) Saeedy(1987) 이론식 비교 77
(3) Cone method 79
(4) 소결 81
Ⅴ. 수치해석에 의한 플레이트 앵커핀인발시 지반의 거동특성분석 83
5.1. 수치해석의 개요 83
(1) 유한요소해석(MIDAS GTS) 83
(2) Mohr-Coulomb 이론 84
5.2. 해석조건 89
(1) 경계조건 89
(2) 입력물성값 산정 90
5.3. 수치해석 결과 93
(1) Case 1 93
(2) Case 2 95
(3) Case 3 97
(4) Case 4 99
(5) Case 5 101
(5) Case 6 103
(5) Case 7 105
(8) 수치해석 결과분석 107
Ⅵ. 하천보강 네트용 플레이트 앵커핀의 최적 형상 연구 109
6.1. 영향범위 109
6.2. 한계소류력 114
Ⅶ. 결론 119
참고 문헌 121
요약 131
Fig. 2.1. Cause of collapses 20
Fig. 2.2. Straight anchor pin 23
Fig. 2.3. Collapse of the stone net 23
Fig. 3.1. Shape of shallow plate anchor 30
Fig. 3.2. Faction factor(Fq) with H/h[이미지참조] 31
Fig. 3.3. Shallow circular anchor 32
Fig. 3.4. (F₁+F₃) and friction angle 34
Fig. 3.5. Qu and H/h[이미지참조] 35
Fig. 3.6. Fq and H/h[이미지참조] 36
Fig. 3.7. Shallow anchor condition 38
Fig. 3.8. Ku and friction angle[이미지참조] 40
Fig. 3.9. Deep anchor condition 40
Fig. 3.10. (H/h)cr and friction angle[이미지참조] 41
Fig. 3.11. Fq* and friction angle[이미지참조] 42
Fig. 3.12. Cavity expansion 43
Fig. 3.13. Hemispherical soil on anchor plate 44
Fig. 3.14. Relationship between Fq of circular anchor[이미지참조] 46
Fig. 3.15. Relationship between Fq of strip anchor[이미지참조] 47
Fig. 3.16. Saeedy's theory 48
Fig. 3.17. Modulus of rupture and friction angle 49
Fig. 3.18. Cone method 50
Fig. 3.19. Shear method 52
Fig. 3.20. Shear destruction model 54
Fig. 4.1. Schematic diagram of field test 56
Fig. 4.2. The view of field test bed 56
Fig. 4.3. Plate anchor pin 58
Fig. 4.4. Schematic diagram of plate anchor pin 58
Fig. 4.5. Geotechnical investigation 59
Fig. 4.6. Boring Log 60
Fig. 4.7. Gradation curve 61
Fig. 4.8. Experiment preparation process 63
Fig. 4.9. Excavation 64
Fig. 4.10. Install anchor pin 64
Fig. 4.11. Construction of anchor pin 64
Fig. 4.12. Basic points 65
Fig. 4.13. Camera set up 65
Fig. 4.14. Digital load meter 65
Fig. 4.15. Load meter connection 65
Fig. 4.16. Pullout loads increment rate 66
Fig. 4.17. Pullout load(case 1) 67
Fig. 4.18. Time histories of the pullout load 68
Fig. 4.19. Plate breakage 70
Fig. 4.20. Concept of image analysis(case 1) 71
Fig. 4.21. Displacement and pulllout load 72
Fig. 4.22. Influence range(case 1) 73
Fig. 4.23. Displacement and influence range 74
Fig. 4.24. Comparison of M & A theory and tests 76
Fig. 4.25. Comparison of Saeedy theory and tests 78
Fig. 4.26. Comparison of D & C theory and tests 80
Fig. 4.27. Comparison of theory and tests 81
Fig. 5.1. Mohr-Coulomb fracture criterion 84
Fig. 5.2. Yield surface in the meridional plane 86
Fig. 5.3. Yield surface of Mohr-Coulomb 86
Fig. 5.4. Flow potential with meridional plane 87
Fig. 5.5. Flow potential with deviation plane 88
Fig. 5.6. Numerical analysis and boundary conditions 90
Fig. 5.7. Deformation coefficient by parametric study 91
Fig. 5.8. Numerical analysis results (case 1) 94
Fig. 5.9. Numerical analysis results (case 2) 96
Fig. 5.10. Numerical analysis results (case 3) 98
Fig. 5.11. Numerical analysis results (case 4) 100
Fig. 5.12. Numerical analysis results (case 5) 102
Fig. 5.13. Numerical analysis results (case 6) 104
Fig. 5.14. Numerical analysis results (case 7) 106
Fig. 5.15. Displacements by cases 108
Fig. 6.1. Influence range 110
Fig. 6.2. Influence area 111
Fig. 6.3. Schematic diagram of tractive force 115
Fig. 6.4. Critical tractive forces 117
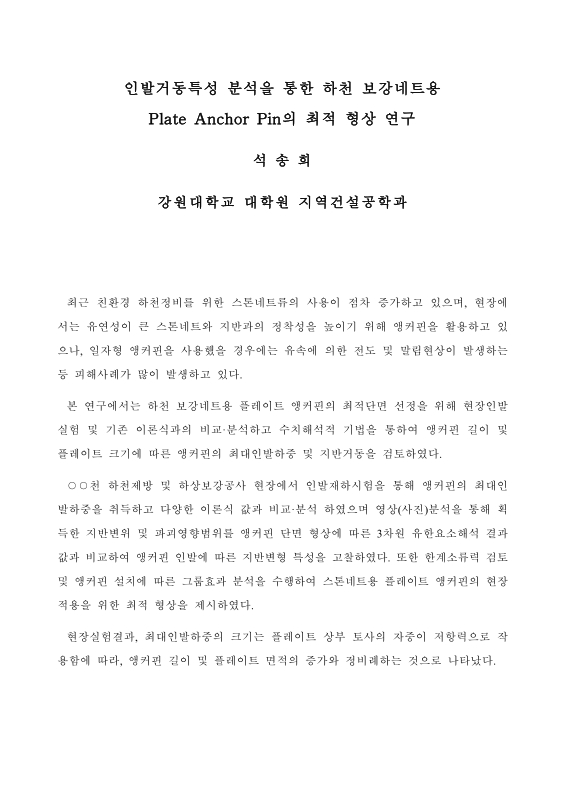
최근 친환경 하천정비를 위한 스톤네트류의 사용이 점차 증가하고 있으며, 현장에서는 유연성이 큰 스톤네트와 지반과의 정착성을 높이기 위해 앵커핀을 활용하고 있으나, 일자형 앵커핀을 사용했을 경우에는 유속에 의한 전도 및 말림현상이 발생하는 등 피해사례가 많이 발생하고 있다.
본 연구에서는 하천 보강네트용 플레이트 앵커핀의 최적단면 선정을 위해 현장인발 실험 및 기존 이론식과의 비교·분석하고 수치해석적 기법을 통하여 앵커핀 길이 및 플레이트 크기에 따른 앵커핀의 최대인발하중 및 지반거동을 검토하였다.
○○천 하천제방 및 하상보강공사 현장에서 인발재하시험을 통해 앵커핀의 최대인 발하중을 취득하고 다양한 이론식 값과 비교·분석 하였으며 영상(사진)분석을 통해 획득한 지반변위 및 파괴영향범위를 앵커핀 단면 형상에 따른 3차원 유한요소해석 결과 값과 비교하여 앵커핀 인발에 따른 지반변형 특성을 고찰하였다. 또한 한계소류력 검토 및 앵커핀 설치에 따른 그룹효과 분석을 수행하여 스톤네트용 플레이트 앵커핀의 현장 적용을 위한 최적 형상을 제시하였다.
현장실험결과, 최대인발하중의 크기는 플레이트 상부 토사의 자중이 저항력으로 작용함에 따라, 앵커핀 길이 및 플레이트 면적의 증가와 정비례하는 것으로 나타났다.
현장실험 및 수치해석결과를 비교·분석한 결과, 앵커핀의 길이가 짧은 경우에는 플레이트와 앵커핀 주변에서 형성된 파괴면이 지표면까지 영향을 미치고, 앵커핀의 길이가 긴 경우에는 파괴면이 지표면에 영향을 거의 미치지 못하는 것으로 판단된다.
유한요소해석을 통한 지반거동특성 분석결과, 토피비(H/h)가 7이하일 경우에 앵커핀 주변에서 발생한 원뿔형태의 변형이 나타나 이론식에서 제시한 지반파괴형상과 유사하여 플레이트 앵커핀의 최적형상은 토피비(H/h) 7이하를 적용하는 것이 합리적인 것으로 사료된다.
본 연구에서는 한계소류력 검토 및 앵커핀 설치에 따른 그룹효과 분석 결과를 바탕으로 스톤네트용 플레이트 앵커핀의 현장적용을 위한 최적 형상을 제시하였다.
향후 지속적인 연구 및 다양한 지반조건에서의 현장 시공사례 검토를 통하여 스톤네트용 플레이트 앵커핀의 최적 심도 및 영향반경에 대한 예측기법 확립이 필요하며, 이를 통해 하천방재시설물의 설계 기술과 성능 향상에 기여할 수 있을 것으로 판단된다.*표시는 필수 입력사항입니다.
| *전화번호 | ※ '-' 없이 휴대폰번호를 입력하세요 |
|---|
| 기사명 | 저자명 | 페이지 | 원문 | 기사목차 |
|---|
| 번호 | 발행일자 | 권호명 | 제본정보 | 자료실 | 원문 | 신청 페이지 |
|---|
도서위치안내: / 서가번호:

우편복사 목록담기를 완료하였습니다.
*표시는 필수 입력사항입니다.
저장 되었습니다.
